Pages

Showing posts with label wedding. Show all posts

01 October 2011

WEDDING ANNIVERSARY


Happy Saturday everyone! Now I can finally upload the card that I made for our church pastor's 43rd wedding anniversary last Monday.

The card's lay-out was based on SC351. Great sketch and I'll probably use this for a couple of times on my future cards. The background panel was embossed using Cuttlebug Floral Fantasy embossing folder. I actually inked one side of the folder before running it through my Cuttlebug machine to give the background a very light "teal" colour. I then matted it onto a teal cs, stamped the sentiment and cut with Spellbinders double-ended tags die and sponged around it with the same ink I used with the embossing folder.  I then used a teal satin ribbon that I bought from Alice in Paperland when I visited their shop few weeks ago and finished off with 3 Kaiser pearls on the bottom right. Oh, I actually sprayed Glimmer Mist Pearl on the embossed panels but the camera didn't capture its sparkle. It looks good IRL. :)

Thanks so much for looking and for always visiting my blog.

Until next post. God bless everyone!

Jhet

Stamps: Happy Messages by Stampendous
Paper: white cs, coloured cs from stash
Ink: Versamagic Sea Breeze
Accessories: Cuttlebug Floral Fantasy embossing folder, Spellbinders Double-Ended tags, Kaiser pearls, satin ribbon

Share/Save/Bookmark

31 May 2011

Wedding in Pink


Happy Tuesday fellow bloggers, stampers and cardmakers!  We're having a gloomy, cold and rainy weather here in Sydney and my bed has been calling me to just go under my comforter and stay warm but I've got lots of chores waiting for me to do. LOL! And of course, I need to post so I can share with you the card I made last night. :)

This was a request from a neighbour/friend who will attend a wedding in 2 weeks time. She sent me an SMS last Sunday night and gave me the motif so I decided to sit and stamp last night -- hence the finish product!


This is also my take for the IC286 challenge over SCS and the swirls on my card was inspired by this Parisian Swirl Pink Lunch Napkins.  I just used a dark green for the fern leaves to give the card a bit of a pop.  The names were stamped using Justrite Stampers with a little from my stamp-a majig for the symbol "&". I sprayed Glimmer Mist Pearl on all the white panels that you can see on the card and it looks so elegant IRL. :)

Thanks so much for the visit and hope to see you again on my next post!

God bless!

Jhet

Share/Save/Bookmark

11 May 2011

Wedding

Happy Wednesday everyone and Happy Mother's Day to all mothers in the world!! Yes, I'm back to my regular postings (hopefully) and sorry for being detached from the blogland for more than 2 months now. A lot of things had happened but nothing to worry about. :)  Things just really got so busy and I even went on a holiday in the Philippines for 18days to attend my father's 70th birthday last April 11.  It was a surprise for him and it really was a success!! :) And of course, precious were the moments that I spent with my family and friends as well.  I went alone as it was just a very short holiday. Hubby had his leave from work and he looked after the boys and our dwelling while I was away. Yes! He managed to take care of the boys and house chores and everything (well, almost everything, LOL!) was in order when I got back!! Wow! I really thank God for blessing me with such a wonderful and ever-supportive hubby! ♥

Okay, on to the card.  I actually made this few days before my holiday.  A church-friend will attend a wedding (during that time) and she wanted a purple card for that. I combined it with black (and white) to make it look elegant.


And here's a close-up shot of the stamped couple wherein I used my Martha Stewart Crystal Fine Glitter for the bride's gown.


I will upload other cards that I made prior to my holiday but for now, I hope you'll like what I've shared. :)

Have a blessed day and to those who are from Australia (where I live); keep yourself warm as this year's Autumn seems to be a very early Winter for us!!

Thanks for the visit!

Jhet

Share/Save/Bookmark

26 September 2010

Happy Sunday everyone! Wow! I'm so glad that finally, after almost a month of not creating any cards, I was able to make one today.  And not only that, I was able to enter this for this week's Free for All Challenge (F4A31) wherein you have to use "scallops".

Obviously, my scallops is the gray mat that I die-cut using my Petite Scalloped Circle (Nestabilities). Unusual colour combo, I know but these are the colours that entered my mind soon as I saw this lovely dp from Grace Taylor's Vintage Collection (bought from Big W).


This card is for our Pastor and his wife's 42nd Wedding Anniversary.  I gave them cards for 2 straight years now and I don't want to miss giving them another one this year.  I'm thankful because if it weren't for this occasion, I think my crafting stuffs will continue to gather dust. :(  I just hope the creative juice will start to flow on  a regular basis now.

The encouraging Bible scripture stamp was from Unity Stamps' Something Within set. I bought this more than a month ago, and I think I've only used 2 stamps from the set to date.  Talking about being slack.

Thanks to all my followers, for still being there despite of the fact that you don't get any notification of a recent post from me. THANKS HEAPS! And because of that, the first commenter (who is one of my followers) on this post will receive a small gift from me, a simple token to show my appreciation.

Thanks once again and may our good Lord bless us always.


Hugs,
Jhet


Share/Save/Bookmark

09 November 2009

Thank You Card

Happy Monday everyone!! Thank God for another Monday! And right now, I wanted to share with you a "Thank You"card that I made as requested by a churchmate. He asked me to make this card to be given to a couple who will get married on Dec and his services (he covers weddings and such on videos) were chosen and so he wanted to say "thanks" on a card. I borrowed the invitation from, him so I could somehow have an idea with regards to the colours or theme used.

Soon as I saw this invitation, I told myself to get the same materials that they used and just made a twist for the thank you card.

Here's the card that I made:

What do you think???!! I was actually about to do a gatefold but changed my mind and used a traditional style instead. I also did not do paper tearing but used a pearlescent cream cs to complement the paper used. There's no ribbon but I did dry embossing using my Cuttlebug Textile folder which I believe complemented the specialty paper. :)
Thanks so much for the visit and let me know what you think by leaving a comment or two when you get the chance.
Have a blessed week!!
Jhet

Stamps: Sentiments Set by Grace Taylor
Paper: Pearlescent Eggplant cs, Pearlescent cream cs, specialty paper, SU! Very Vanilla
Ink: Versacolor Violet
Accessories: Spellbinders Circle Nesties, Fiskars Circle punch, Cuttlebug Textile embossing folder, heat gun, clear ep, corner punch, pop dots

Share/Save/Bookmark

08 August 2009

Wedding Card

Hello once again! This is my second post for the day so scroll down if you wanna see my first post.

This card is another requested card by one of the youth members of our church, the lovely Louise. She asked me 2 weeks ago to make a wedding card for her friend and my mind was so blank to put together a wedding card (for the past few days) that's why I just finished this one few hours ago. My Mojo seems to be somewhere else lately..good thing it came back right on time. LOL!

She didn't give me any particular colours so I called the shot for this one. Here it is:


My card base is a white cs, then I matted this shimmery dp from Grant Archival with a black cs and adhered it to the card base. I used my ticket corner punch on the four sides of the dp so I can put on some tiny pearls on it.

Originally, the image and the sentiment (which is a rub on) were stamped and rubbed on together and was die cut using Labels One. But when I did my sponging, I didn't like the way it turned out. So I cut half of the Labels 1 and just took the part where I rubbed on the sentiment. I then stamp the hearts image again and embossd it using clear ep, cut it with my circle Nesties and adhered it to my scalloped Nesties.

To hide the edge of the cut Labels 1, I then adhered black grosgrain ribbon then put another organdy ribbon on top of it. The rest is self explanatory. I hope she likes this one when I hand this to her tomorrow.

How about you? What do you think of this card?

Thanks for looking.


HUGS,


Share/Save/Bookmark

18 July 2009

LSC229 My Wedding Colours

Hi everyone! Happy Saturday! First, I would like to thank God for this wonderful day that He has blessed me. For last night as well as I was able to share the book of Hosea during our Bible study. It was a very wonderful book and I highly recommend that you read it because it speaks about love and redemption...the everlasting love of our God.

I've just finished my card for the LSC229 over SCS. In this challenge you are to use either your wedding colours or your high school colours; and use any clips or photo turners. In my case, I chose my wedding colours not only that they're my favourite (remember brown?) but I still have some of the very materials that I used when I made our invites.

Here's my card:

These really were our wedding colours and if you want to see my evidence (LOL!) you can check out this previous POST of mine where I posted my wedding stuffs.

The stamp that I used is from Darkroom Door Essentials2 Collection. I stamped it twice onto Very Vanilla cs, went over it with my Aqua brush to put some intensity and a bit of shading on the colours and went over some parts of the flowers with my orange Copic Spica glitter pen.

Here's a closer shot:

And since we are to use any clips and I don't have any special clips here, I then used a regular paper clip and tied my chocolate-coloured ribbon around it (which is also the same ribbon I used on my wedding). The pearlescent cs was embossed using Cuttlebug Argyle embossing folder. I love the effect! The sentiment on the other hand is also from the same stamp set and was die cut using my Shapeabilities Daisy Heads (the leaf part).

What do you think?

Thanks for looking and have a blessed and lovely day wherever you are.

HUGS,


Share/Save/Bookmark

17 July 2009

Quick Post {Wedding Card}

Hello everybody! I know it's been awhile and this one's just a quick post for now. I just want to share with you a wedding card I made as requested by a friend.

She didn't give me any colours so I called the shot for this. :) I just want the Groovy Guava to show a little so that the emphasis will remain on the white colour. I stamped the image using Groovy Guava ink and heat-embossed it with clear ep. The rest is self-explanatory.

Got to go now. My Hosea sharing for last week was cancelled as many church members were sick so I will be sharing tonight instead.

Thanks and have a blessed day!
Share/Save/Bookmark

28 May 2009

50th Wedding Anniversary Card

Hi everyone!!! Yes, I've been MIA the past few days, I admit it. Well, I've been pretty busy around the house and making requested cards for friends. Last Sunday I was able to sell 2 cards (I think those two were just recently posted here) and my churchmate really liked them!

Anyway, onto the card. This one was requested by our Pastor's wife. She asked me to make her a 50th Wedding Anniversary card to be given to her Aunt. This is my first time to make such card and I thank the "gold" colour for making it easier for me, LOL! I mean , at least, I didn't need to think what colour to be used with what. :) So, after some internet searching for some inspiration, I finally put my ideas into a card:


The scripture is from ODBD Scripture Collection 1. I brought my ODBD stamp set to church last Sunday just so to show them that I already have a scripture stamp set! And our Pastor's wife told me to use this particular verse for the Golden Anniversary card.

I stamped the ODBD onto Very Vanilla cs with Versamark and heat-embossed it with Hologram Gold ep (by Celebrations of Australia), cut it with my Spellbinders' Labels 2, and matted it onto a pearlascent Old Gold cs which was also cut with a bigger Spellbinders' Labels 2 die. I used Antique Cream Mist for the base which is really nice IRL, followed by the Old Gold cs, then with another Very Vanilla. I also cut a piece of the Antique Cream Mist (for the horizontal panel) and embossed it with Cuttlebug Swiss Dots folder. I punched 3 Old Gold hearts for the 3 corners and finished it off with number 50 on the bottom right which was cut using Cuttlebug Olivia Alphabet die.

What do you think?? =)


Stamp/s: Scripture Collection 1- ODBD

Inks/s: Versamark, unknown Old Gold ink

Papers: Antique Cream Mist cs, Pearlascent Old Gold cs, SU! Very Vanilla

Accessories: Spellbinders Labels 2, Cuttlebug Swiss Dots embossing folder, Cuttlebug Olivia Alphabet dies, heat gun, Hologram Gold ep (Celebrations of Australia), hear punch, pop dots


Share/Save/Bookmark

01 April 2009

Wedding Card

Hi all! Let me share with you a Wedding Card that I made yesterday afternoon. I had a play with my Pearlescent cs and I really like how it turned out. I've seen lots of cards made of Pearlescent cs embossed in Cuttlebug folders and they really are elegant looking that's why I gave it a try myself.

This is my finished product:


The wedding doves is a stamp I bought from ebay that I received yesterday. It's actually second-hand but I opted to buy it as I don't have any wedding themed stamps on hand. I stamped the image onto my Pearlescent cs with Versamark, heat-embossed with Hologram Gold embossing powder then cut with Oval Nestabilities. I Cuttlebug-embossed the panel with Swiss Dots and finished off the card with a golden grosgrain ribbon from Jenni Bowlin.


Thanks so much for the visit and have a blessed day!


Share/Save/Bookmark

08 November 2008

A Quick Post and a Wedding Card

Hello! This is just a very short post as I need to prepare the kids for our dinner out tonight. A friend whom I've last seen about 10 yrs ago is here in Sydney atm. She just got married and they're having their honeymoon here in Australia. We used to work together, she was my crew and I was her manager. She was just a working student then but now she's a FedEx Supervisor and just got married!!! And since I wasn't able to send her a card (she got married 25 OCtober), I decided to whip a card for her and her hubby. This is just a very, very simple one as in no stamping done, only cuttlebugging and Scor Pal-ing ;) .


I used my Cuttlebug Swiss dots embossing folder to emboss the bottom part of my SU! Whisper White. I also used my Scor Pal to create lines around the image, sort of a frame. The stickers (which are very glittery) were from Big W at AU$1.97! The whole wedding sticker page consists of about well, more than 15 stickers and they're all in glitter! Isn't it a bargain again? I matted the Whisper White onto a silver coloured cardstock mat from DCWV metallic stack. And the silver ribbon (I just don't know how you call this thingy LOL!) is from my stash.

This is my very first wedding card actually. Thanks for looking and enjoy the rest of the day!

God bless us all.


Share/Save/Bookmark

02 April 2008

TRADITIONAL SCRAPBOOK LAYOUTS


yeheyy! I have made my very first traditional scrapbook page. I'm a beginner when it comes to paper and scissors scrapbooking but I love the outcome...well, it's not that bad somehow. =) I used our family photos taken last Christmas for a Christmas theme page. I used the border punchers that I bought and the Christmas stickers that I have on hand. I have started with another page and will soon post it on this blog so watch out for it. so... what do you think?


here's our wedding scrapbook page! my 2nd LO in 2days...not that bad hehehe! our colours were brown and orange so it went well with the patterned paper that I bought from Spotlight the other day (c/o Kaiser)..I also used copper coloured card stock (which were left overs from our DIY wedding invites), and the brown flower brads from Spotlight as well. my darling husband liked it very much..and I liked it as well...of course =) now I'm on to my next LO...can't wait to develop my skills in scrapbooking. thanks for the internet info, I'm learning a lot. I will do another page using our wedding photos...so, we'll see how it goes this time.
Share/Save/Bookmark

my DIY wedding stuffs


OUR UNITY CANDLE

I really love these candles! I just researched over the net on how to make your own unity candle and voila! My candles received a lot of positive comments. Candles were bought from the dollar shops and the ribbons were from Spotlight. The beautiful candle holders were bought from Dusk. What do you think?


INVITATION, BONBONS & ORDER OF SERVICE

here is our wedding invitation that I made myself. our colours were a combination of brown and orange. our "giveaway" was a chocolate-scented candle (hmmmm..it's really yummy to the smell!) which we bought from Dusk. I wrapped it in tulle and tied it with an orange ribbon to hold the tag as well. (tulle and ribbon were from Spotlight). on the right side was our Order of Service, which I also did myself... the outer cover was a vellum paper, the front cover was an orange shade paper from Officeworks (and the inserts as well).


Share/Save/Bookmark


TREASURE CHEST

This treasure chest was made out of a box which I bought from a dollar shop. I wrapped it with a patterned paper that matches our motif (which I also bought from the dollar shop) and put a brown ribbon around to somehow seal the box. I also put a brownish-coloured flowers to accentuate the chest.


GUEST BOOK

This guest book was on special in Koorong and I decided to match its cover with the treasure chest that I made. I put a brown organza ribbon on the side and accentuate it with orange flower blings (from Spotlight of course!)


RING PILLOW


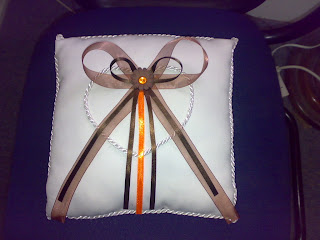
Our ring pillow was part of my bridal gown package. It originally came in the traditional ivory and white colours but I decided to jazz it up to (again) match our wedding colours. I just used coordinated ribbons in brown and orange (satin and organza) and that's it! Materials used were all from Spotlight.


Share/Save/Bookmark

31 March 2008

DIY stuffs

hello everyone! here I will be sharing with you some of my DIY creations which I made during our wedding last year. I did our invites, bonbons, treasure chest, guest book and jazzed up our wedding cord and pillow as well. and you know what? I became crafty and became so interested in this field that I even ventured into scrapbooking! yes! scrapbooking - digital and traditional. watch out for the photos that I'll be posting soon!
Share/Save/Bookmark

LinkWithin

Blog Widget by LinkWithin